Thank you to Patricia for inviting me to be a guest blogger today!
My real name is LeAnn Frobom. I’ve been a fabric lover most of my life. I started sewing and embroidering at the age of four.
I grew up on a farm in eastern South Dakota. I was active in 4-H and debate, and went on to major in Home Economics at South Dakota State University. I veered off that path and ended up in law school. I’ve spent thirty-odd years using my law degree and raising three wonderful kids. But I never completely abandoned my love of fabric, sewing, handwork and quilting.
I’m now a semi-retired empty-nester with three grown kids, two grown stepchildren, and nine delightful grandchildren. In 2011, I opened my Etsy shop, Pasque Flower Creations, which features boutique children’s clothing and other fun and functional fabric items. I also started a blog, Pasque Flower Ponderings and joined the Etsy Blog Team, and that’s how I “met” Patricia aka Mamaw.
I will be showing you how to make an easy peasy table runner, based on LaRae Bunnell Clark’s Ten Minute Table Runner. (There’s no commercial pattern.) LaRae is affiliated with Utah State University’s Weber County Extension Office and she has granted permission to freely enjoy and share this fun project. (It takes me a little more than ten minutes, but even a beginner can complete one in about an hour.) Your finished table runner will be approximately 41 inches long and 15 inches wide.
I’ve chosen to use fun and funky Halloween fabric for this tutorial. I’ve made several using seasonal fabrics, but any two fabrics that play well together would be fine.
Ready? Here we go!
STEP 1: CHOOSE YOUR FABRICS
1/3 yard of a “theme” or focus fabric x width of fabric (WOF) –12 inches by 42 inches
1/2 yard of a coordinating fabric x WOF – 18 inches by 42 inches
I chose Cackle Jacks from The Alexander Henry Fabrics Collection for my theme fabric. I just love those colorful wacky jack-o-lanterns!
Choosing my coordinating fabric was more difficult. I had three strong contenders, but I decided to use a Maywood Studio black with tiny tan dots from my stash. I had also considered the purple and black Lilac Parade from the Buggy Barn for Henry Glass & Co. and an orange and cream Lonni Rossi print from Andover Fabrics Inc. In the end, I decided the black would best anchor my wild and crazy focus print.
STEP 2: PRESS & TRIM
Press your fabrics. Trim selvages. Square up your fabric to create a straight edge with no fabric whiskers.
STEP 3: SEW
Place your fabrics right sides together (RST). Sew one long edge with a ½ inch seam allowance.
Now bring the unsewn long edges of your fabrics together and sew with a ½ inch seam allowance.
No need to finish these seams. They’ll be tucked out of sight inside your finished table runner. (NOTE: If you wanted to dress up your runner, you could insert thin fabric piping between the two fabrics.)
STEP 4: PRESS AGAIN
Press the seams away from the center or theme fabric and toward the coordinating fabric.
Turn your fabric tube right side out.
Lay your fabric tube on your ironing surface, theme fabric showing, and carefully measure the borders so that they are exactly the same width on either side of your center fabric. I measure in at least four or five spots as I am pressing. (That’s probably why it takes me more than 10 minutes!)
STEP 5: FINISH THE SHORT ENDS
Trim the short ends so they are even and perpendicular to the borders.
Serge or zigzag stitch each of the short ends to prevent raveling. If serging, be sure to tie, weave, and snip your thread tails.
Fold your fabric in half lengthwise so you have a long skinny rectangle with your theme fabric showing.
Stitch a ½ inch seam through all 4 layers of fabric on each of the short ends.
STEP 7: PRESS AGAIN
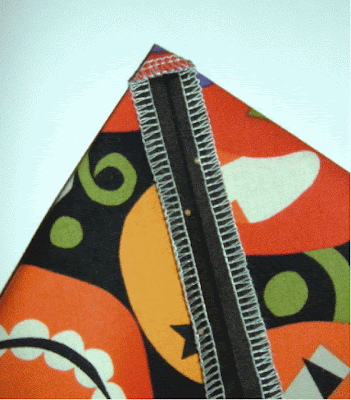
Open the folded rectangle so that the coordinating fabric side is up and the theme fabric is on the bottom. Align the seam you just sewed with the center fold on the coordinating fabric and press the seam open. You will have a teeny tiny triangle at the top of the larger triangle. I usually turn and tack the seam edges at the other end of the short seam as well, but that is optional.
Now flip the end triangles so that your seam is hidden inside the triangle. You should have two end triangles of your coordinating fabric. I usually measure from the center seam to the right edge and the center seam to the left edge to make sure my triangle is properly centered. I also use my handy dandy That Purple Thang Tool to make sure my points are sharp.
STEP 9: PRESS AGAIN
Now press those perfectly centered end triangles so you have nice sharp points and crisp edges.
STEP 10: ADD BUTTONS
Sew a decorative button through the center seam of the end triangle and the theme fabric. Try not to stitch through the coordinating fabric on the back. You could add rick rack, more buttons, yo-yo’s or whatever your little creative heart desires, but I usually just pick a fun button.
STEP 11: VOILA!
All done! Wasn’t that easy? And you now have a reversible table runner. Enjoy!
TTFN (Ta Ta for Now)
LeAnn aka pasqueflower
http://pasqueflowerponderings.blogspot.com
http://www.etsy.com/shop/pasqueflower

LeAnn I want to thank you for being a guest on my blog. Your biography was wonderful. I am sure everyone will enjoy you tutorial on the easy peasy table runner. Good luck with you Etsy shop and your blog.
Patricia aka Mamaw


Super cute!! We love Halloween!!
ReplyDeletei like it. cute blog design, too.
ReplyDeleteHey super cute and easy!
ReplyDelete